
Swing Check Valve – Diagram, Types, and Applications
The Application of Swing Check Valve
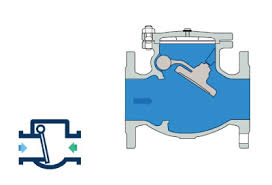
Introducing Cameron’s top-notch swing check valve, a pivotal component for fluid control systems. From standard to specialized applications, such as the 3 4 swing check valve or brass swing check valve, our products excel in reliability and performance. Designed to regulate fluid flow, the swing check valve operates on a swinging mechanism, allowing flow in one direction while preventing backflow. Its simple yet effective design ensures efficient flow control and minimal pressure drop. Need a visual aid? Check out our swing check valve diagram for a clear understanding of its operation. Trust Cameron for unparalleled quality and durability in swing check valves, catering to diverse industrial needs with precision and excellence.
What Are The Types Of Swing Check Valve?
- Standard Swing Check Valve: This is the most basic type of swing check valve, featuring a swinging disc suspended from a hinge mechanism to control flow.
- Dual Disc Swing Check Valve: These valves have two discs that swing open and closed, providing improved sealing and reduced pressure drop compared to standard swing check valves.
- Tilting Disc Swing Check Valve: In this type, the disc tilts away from the seat to allow flow and returns to a vertical position to prevent backflow. This design reduces the potential for water hammer.
- Silent Check Valve: Also known as non-slam or no-slam check valves, these valves are designed to minimize water hammer and noise during operation by employing specialized disc and seat configurations.
- Wafer Check Valve: Wafer check valves are compact and lightweight, designed for installation between flanges. They are suitable for applications where space is limited.
What Is Swing Check Valve?
A swing check valve is a type of check valve used in piping systems to control the flow of fluids. It consists of a hinged disc that swings open to allow fluid to flow in one direction and swings closed to prevent backflow. When the flow stops or reverses, gravity and fluid pressure cause the disc to swing shut, sealing the valve and preventing reverse flow. Swing check valves are commonly used in applications where backflow prevention is essential, such as in water and wastewater systems, plumbing, and industrial processes.
How to Select the Right Swing Check Valve?
When selecting the right swing check valve, consider factors such as flow rate, pressure, temperature, and the type of fluid being conveyed. Evaluate the size, material, and design of the valve to ensure compatibility with your specific application requirements.
Features of Swing Check Valve
- Swinging Disc Design:
- Swing check valves feature a swinging disc that allows for unidirectional flow, swinging open to permit flow and closing to prevent backflow.
- Simple Operation:
- The operation of swing check valves is straightforward, relying on gravity and fluid pressure to open and close the valve.
- Effective Sealing:
- These valves provide effective sealing against backflow, minimizing the risk of reverse flow and ensuring system integrity.
- Low Pressure Drop:
- Swing check valves typically offer low pressure drop, allowing for efficient flow with minimal resistance.
- Versatility:
- Available in various sizes, materials, and configurations, swing check valves are versatile and suitable for a wide range of applications.
- Minimal Maintenance:
- With few moving parts and a simple design, swing check valves require minimal maintenance, reducing downtime and operational costs.
Advantages and Disadvantages of Swing Check Valve
Advantages:
- Effective Backflow Prevention: Swing check valves effectively prevent backflow, ensuring the integrity of the system and preventing contamination of fluids.
- Low Pressure Drop: These valves offer low resistance to flow, resulting in minimal pressure drop across the valve and improved system efficiency.
- Simple Design: The design of swing check valves is simple, with few moving parts, making them reliable and easy to operate.
Disadvantages:
- Potential for Water Hammer: In certain conditions, swing check valves may experience water hammer, causing pressure surges that can damage pipes and equipment.
- Limited Flow Control: Swing check valves provide limited flow control compared to other valve types, such as globe valves or gate valves.
- Size Limitations: Larger swing check valves may require significant space for installation, limiting their suitability for compact systems.
The Specifications of Swing Check Valve
| Specification | Details |
|---|---|
| Type | Swing Check Valve |
| Body Material | Cast Iron, Ductile Iron, Carbon Steel, Stainless Steel, Bronze, etc. |
| Disc Material | Stainless Steel, Carbon Steel, Brass, Bronze, etc. |
| Attachment Type | Flanged, Threaded, Welded, Wafer, Grooved, etc. |
| Thread Standard | ANSI B1.20.1, BSPT, DIN, JIS, etc. |
| Thread Size | 1/2 inch – 24 inches (or as per specification) |
| Safe for Use With | Water, Oil, Gas, Steam, Chemicals, etc. |
| Handle Type | Handwheel, Lever, Gear Operated, Actuated, etc. |
| Handle Material | Stainless Steel, Carbon Steel, Aluminum, etc. |
| Maximum Working Pressure (psi) | Up to 2500 psi |
| Maximum Working Pressure (bar) | Up to 172.37 bar |
| Operating Pressure | Depends on the maximum working pressure and application requirements |
The Installation Steps for Swing Check Valve
- Preparation:
- Gather all necessary tools and equipment, including wrenches, gaskets, and pipe thread sealant.
- Ensure the work area is clean, dry, and free from debris.
- Valve Positioning:
- Identify the optimal location for the swing check valve within the pipeline, considering factors such as accessibility and flow direction.
- Valve Orientation:
- Ensure that the swing check valve is installed in the correct orientation, with the flow direction indicated by the arrow on the valve body.
- Attachment Connection:
- Connect the swing check valve to the piping system using the appropriate attachment type, such as flanged, threaded, welded, or grooved connections.
- Apply pipe thread sealant or gaskets to ensure a secure seal.
- Alignment:
- Align the swing check valve with the pipeline to ensure proper installation and operation.
- Use alignment tools or shims as needed to achieve the desired alignment.
- Tightening:
- Securely tighten the bolts or nuts on the valve flanges to ensure a leak-free connection.
- Follow the manufacturer’s specifications for torque requirements.
- Pressure Testing:
- Conduct a pressure test on the swing check valve and piping system to ensure there are no leaks or defects.
- Gradually increase pressure and monitor for leaks, following industry-standard procedures.
- Final Inspection:
- Inspect the installed swing check valve for proper alignment, tightness of connections, and overall functionality.
- Verify that all components are installed correctly and securely.
- Documentation:
- Maintain detailed records of the installation process, including valve specifications, pressure test results, and any adjustments made during installation.
- Update system documentation and diagrams to reflect the newly installed swing check valve.
- Training:
- Provide training to relevant personnel on the operation, maintenance, and troubleshooting of the swing check valve system.
The Operation Theory of Swing Check Valve
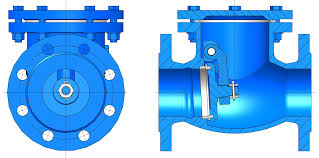
- Swinging Mechanism: The swing check valve features a hinged disc or flap that swings open in the direction of flow, allowing fluid to pass through the valve.
- Preventing Backflow: When the flow stops or reverses, gravity and fluid pressure cause the disc to swing shut, sealing the valve and preventing reverse flow.
- Efficient Flow Control: Swing check valves operate with minimal resistance to flow, resulting in low pressure drop and efficient fluid movement.
In terms of installation, swing check valves typically follow a straightforward process:
- Swing Check Valve Installation:
- Positioning: Determine the optimal location for the swing check valve in the pipeline, considering flow direction and accessibility.
- Attachment: Connect the valve to the piping system using the appropriate attachment type, such as flanged or threaded connections.
- Orientation: Ensure the valve is installed in the correct orientation, with the flow direction indicated by the arrow on the valve body.
- Tightening: Securely tighten the bolts or nuts on the valve flanges to ensure a leak-free connection.
The Parameters Chart of Swing Check Valve
| Parameter | Material |
|---|---|
| Valve Type | Swing Check Valve |
| Body Material | Cast Iron, Ductile Iron, Carbon Steel, Stainless Steel, Bronze, etc. |
| Disc Material | Stainless Steel, Carbon Steel, Brass, Bronze, etc. |
| Seat Material | Stainless Steel, Carbon Steel, Brass, Bronze, etc. |
| Hinge Pin Material | Stainless Steel, Carbon Steel, Brass, Bronze, etc. |
| Connection Type | Flanged, Threaded, Welded, Wafer, Grooved, etc. |
| Seal Material | Nitrile, EPDM, Viton, PTFE, Graphite, etc. |
| Maximum Working Pressure (psi) | Up to 2500 psi |
| Maximum Working Pressure (bar) | Up to 172.37 bar |
| Operating Temperature | -20°C to 400°C (or as per specification) |